Okay, so check this out—managing more than one coin on a hardware wallet is liberating, but it also invites complexity. Seriously. You get the convenience of a single device holding Bitcoin, Ethereum, and a handful of altcoins, and then you realize each chain has its own quirks, address formats, and signature rules. My instinct said “this will be fine,” until I watched someone accidentally broadcast a SegWit address where a legacy format was needed. Oof.
Here’s the thing. Hardware wallets like the one I use (I’m biased, but a lot of pros like trezor) give you a powerful separation: keys offline, signing secure, and the device as a single source of truth. But multi-currency support, offline signing workflows, and passphrase security are layers that interact in subtle ways—and if you misunderstand one, you can make a small mistake with big consequences.
![]()
Using one device for many assets reduces physical clutter and centralizes your security model. You don’t carry ten different seeds in a shoebox. You carry one device, one recovery seed, and you manage accounts separately. That’s elegant. Yet the risk comes from assumptions: a single interface might hide chain-specific details, wallet integrations might not verify addresses correctly, and third-party apps can misinterpret derivation paths.
For example, Ethereum’s account model differs from Bitcoin’s UTXO model, and some tokens (ERC-20, BEP-20) use contract interactions that require understanding gas pricing and nonce management. If a wallet or app auto-populates a gas fee that’s too low, your transaction stalls. If you mix address types in Bitcoin (bech32 vs. legacy), you can send coins to an incompatible service. So: neat, but pay attention.
Offline signing is the bedrock of hardware-wallet security. You prepare a transaction on an online machine (PSBT for Bitcoin, unsigned tx for other chains), transfer it to your air-gapped device, sign it without exposing private keys, then move the signed transaction back to the online machine for broadcast. Simple description, but the devil is in the workflow.
Two common workflows:
Here’s what often trips people up: assuming the unsigned transaction you built matches what the device will sign. Always verify outputs and amounts on the hardware-device screen. Don’t trust the desktop UI blindfolded. Confirm the recipient address visually if possible (some devices display a checksum or shortened preview). If your workflow includes PSBTs, use verifiable tools (clean, well-known software) to construct them.
Also: test with tiny amounts first. This is basic, but it’s very very important. Send a dollar’s worth before moving major sums. Offline signing reduces key exposure, but it doesn’t replace double-checking transaction metadata.
Passphrases (BIP39 passphrases, often called the 25th word) can turn a single seed into many logical wallets. That’s powerful. My gut feeling the first time I used a passphrase was: “Wow—this is a vault inside a vault.” But then I realized how easy it is to lose access: passphrase forgotten equals permanent loss. No recovery service can help. Ever.
Use passphrases for segregation (hot vs. cold accounts), plausible deniability, or separate high-value storage. But follow strict operational rules:
Be aware of these common failure modes: using an unexpected character (capitalization, punctuation), typing errors when recreating the passphrase, or switching keyboard layouts. Those mistakes lock you out. Also, some wallets show a different account hierarchy when a passphrase is set, so you might think funds vanished when in fact you’re viewing the wrong passphrase-derived wallet. Take a breath when that happens—it’s often not lost, just hidden under an alternate passphrase.
Practical steps I use and recommend—nothing fancy, just tried-and-true:
Oh, and by the way—watch phishing: malicious sites might mimic wallet UIs and trick you into signing transactions. If an interface asks you to sign something that seems unrelated to a transfer (like approving a contract that can spend all your tokens), pause. Seriously pause.
Here are the things that keep me up at night, and some fixes:
No. Many modern devices support multiple chains natively. One device can manage Bitcoin, Ethereum, and dozens of altcoins, but verify each coin’s integration and test before migrating large amounts.
Not always, but it’s the safest approach for significant transfers. For routine small transactions, a connected hardware wallet still signs transactions on-device, which is secure; offline signing adds protection against desktop compromise.
If you lose the passphrase, and it wasn’t backed up, those funds are effectively unrecoverable. That’s why passphrase management deserves the same care as your seed phrase—maybe even more.
¿Instalar MetaMask como extensión del navegador o usar la app móvil? Esa pregunta parece técnica pero define seguridad, comodidad y qué tanto control tendrás sobre tus fondos y dApps. En este artículo uso un caso práctico —un usuario en España que quiere probar una dApp de tokens en una red de prueba pero encuentra un error RPC en MetaMask— para explicar el mecanismo detrás de la extensión, comparar opciones y ofrecer reglas prácticas de decisión para usuarios de ES, US-ES y LATAM.
La intención no es vender MetaMask; es explicarte cómo funciona, por qué aparecen errores como el RPC, dónde la extensión ayuda y dónde limita, y qué cuidados mínimos aplicar para no perder claves ni caer en estafas. Al final tendrás un marco simple para decidir instalar la extensión o la app y cómo diagnosticar fallos comunes.
![]()
Imagina: estás en tu portátil, quieres probar una dApp en una testnet. Conectas MetaMask y la interfaz front-end devuelve un « MetaMask RPC error ». Cambias gas, nada; la dApp sigue sin funcionar. Este escenario apareció en foros técnicos recientemente y revela capas importantes sobre cómo opera MetaMask.
Mecanismo: MetaMask actúa como cliente RPC (Remote Procedure Call) que traduce peticiones web3 de la dApp al nodo Ethereum configurado (público o propio). Un « RPC error » típicamente indica: la dApp pidió algo que el nodo no pudo procesar; la red está congestionada; la configuración de red en MetaMask es incorrecta; o la propia extensión bloqueó la petición por razones de seguridad o incompatibilidad. No es un fallo mágico de MetaMask sino una fricción entre front-end, cliente y red.
Instalar la extensión en navegadores compatibles (Chrome, Firefox, Edge, Brave) es directo: añadir la extensión desde su tienda oficial, crear o importar una cuenta y guardar la frase secreta (seed phrase) en lugar seguro. Dos reglas cruciales al instalar: nunca introducir la seed phrase en páginas web y evitar copiarla en el portapapeles por riesgo de malware. Usa un gestor de contraseñas cifrado o anota la frase físico en papel guardado fuera de línea.
Si buscas la extensión en un recurso de confianza, puedes comenzar por la página oficial o por guías dedicadas; una instalación útil para usuarios hispanohablantes está disponible como extensión metamask. Pero atención: verificar la URL y la identidad del proveedor sigue siendo tu responsabilidad. Los ataques de clonación de extensiones existen y se propagan mediante tiendas no oficiales o enlaces en redes sociales.
Mecanismo comparado: la extensión vive en el contexto del navegador y tiene acceso directo a las pestañas que piden permisos; la app móvil funciona como aplicación independiente y suele ofrecer integración con WalletConnect para enlazar dApps en navegadores móviles. La extensión habilita experiencias de desktop más fluidas (firmar transacciones al instante, inyectar web3 en páginas), mientras que la app móvil prioriza movilidad y, a veces, mayor aislamiento en el sistema operativo.
Ventajas de la extensión: experiencia de desarrollo más directa (útil si estás probando dApps), atajos para redes de prueba y agregación directa de permisos en el navegador. Desventajas: mayor exposición si el navegador está comprometido; las extensiones pueden ser objetivo de scripts maliciosos o ventanas emergentes engañosas.
Ventajas de la app móvil: menos superficie de ataque para extensiones maliciosas y mejor integración con autenticación biométrica del teléfono. Desventajas: pantalla reducida para revisar detalles de transacción y mayor dependencia en la seguridad del sistema móvil (actualizaciones, apps instaladas).
Cuando ocurra el error, aplica esta secuencia de diagnóstico —rápida y práctica— antes de asumir culpables:
1) Verifica la red seleccionada en MetaMask: ¿es la correcta (Mainnet, Goerli, otra testnet) y con RPC configurado correctamente? Cambios en RPC o nodos caídos producen errores inmediatos.
2) Revisa la consola del navegador (si sabes hacerlo): a menudo las respuestas del nodo muestran códigos HTTP o mensajes JSON que aclaran qué petición falló.
3) Intenta con otro RPC público o con un proveedor distinto. Si la dApp funciona con otro RPC, el problema es del nodo o de su cuota/limite, no de la dApp.
4) Comprueba si la dApp requiere versiones de firma o métodos RPC recientes que tu MetaMask no soporta (esto es menos común pero posible con dApps experimentales).
Este orden prioriza cambios reversibles y te evita exponer la seed phrase o reinstalar innecesariamente la extensión.
Mito 1: « Si instalo la extensión, mi cartera está siempre en peligro. » Realidad: la extensión introduce riesgo adicional relativo al navegador, pero las mejores prácticas (seed offline, contraseñas fuertes, evitar extensiones sospechosas) reducen ese riesgo significativamente. No es cero riesgo; es un riesgo gestionable con controles básicos.
Mito 2: « Los RPC errors son culpa exclusiva de MetaMask. » Realidad: son síntomas de fallas en la cadena cliente-nodo-dApp. Culpar a MetaMask omite que nodos saturados, configuraciones erróneas o problemas en la dApp pueden causar exactamente el mismo mensaje.
Mito 3: « Usar la app es siempre más seguro. » Realidad: depende del vector de amenaza. En un teléfono con apps pirata o sin actualizaciones, la app puede ser menos segura que un navegador limpio en un equipo bien gestionado.
Heurística 1 (desarrollo y pruebas): si vas a interactuar frecuentemente con dApps en escritorio y necesitas reproducir fallos, usa la extensión, pero configura varias redes RPC de prueba y un navegador dedicado sin extensiones adicionales.
Heurística 2 (uso diario y movilidad): para pagos sencillos y acceso sobre la marcha, la app móvil es adecuada, preferiblemente con bloqueo biométrico y backup de la seed en lugar seguro.
Heurística 3 (fondos significativos): considera almacenamiento en frío para grandes cantidades y usa MetaMask solo para interacción operativa con límites de exposición; ningún software de hot wallet debe custodiar fondos que no puedas permitirte perder.
Limitación técnica: MetaMask no es un nodo completo; depende de RPC externos. Esto limita la previsibilidad de respuestas y explica por qué los errores RPC son relativamente comunes durante pruebas o congestiones. El trade-off es práctico: confiar en RPC públicos facilita la experiencia pero añade una dependencia externa.
Limitación operativa: las extensiones no controlan la totalidad de la UX de una dApp; problemas de interfaz o de contrato pueden parecer errores de wallet cuando no lo son. Identificar la fuente requiere algo de práctica técnica.
Qué vigilar: congestión de redes, cambios en APIs RPC o en métodos de firma, y aparición de clones de extensión en tiendas. Esos son señales tempranas que pueden justificar migrar entre extensión y app o reforzar controles.
Sí: puedes exportar/importar la frase semilla o usar opciones como WalletConnect para conectar la app a sesiones web. Importar la seed en más dispositivos aumenta la superficie de ataque; valora si realmente necesitas acceder desde ambos entornos.
No la confirmes. Revisa la dirección destino y el contrato; comprueba si la aprobación pide « infinite approval » para tokens – evita dar permisos ilimitados. Si dudas, cancela y consulta con la comunidad o soporte oficial antes de proceder.
Verifica la fuente oficial, revisa el número de descargas y comentarios en la tienda, consulta la web oficial del proyecto y evita enlaces virales. Para mayor seguridad, descarga desde la tienda de extensiones del navegador y comprueba la presencia de actualizaciones regulares.
No. Ajustar gas puede arreglar reintentos de transacción, pero los errores RPC suelen estar ligados a configuración de red, límites del nodo o incompatibilidades de la dApp. Diagnostica el origen antes de cambiar parámetros de transacción.
So I was fiddling with wallets the other night and noticed my token list looked…off. Wow! The little red flags in my head lit up fast. My instinct said something felt wrong about relying on a single site for token details. On one hand I trust explorers, though actually—wait—let me rephrase that: trust is earned, not given, and tools that sit in your browser deserve a second look.
Here’s what bugs me about the naive setup most folks use. Seriously? People still copy-paste contract addresses from random tweets. Hmm… That makes me uneasy. I kept thinking about how a small UI nudge could prevent big mistakes, and why browser extensions are such a natural fit for that problem—because you see them while transacting, right where mistakes happen.
I installed an Etherscan-related extension and the effect was immediate. Whoa! It added a token badge on hover and a small verification hint next to contract addresses. At first glance it felt like a little convenience, but then the tiny checks saved me from digging deeper into a contract I was about to interact with. Initially I thought this was fluff, but then realized those micro-interactions change behavior a lot—humans are lazy and visual cues matter.
Okay, so check this out—browser-based token tracking fills a gap between raw chain data and user decisions. Wow! You get transaction history, holder distribution, and verification status without leaving the dApp. My gut said « this will help, » and the data-backed nudges meant I avoided a likely scam token. There were also moments where the extension felt clunky, somethin’ to improve, but overall the reduction in friction was notable.
Design matters more than we admit. Really? I mean, people click what looks trustworthy. Hmm… A small green checkmark can mean the difference between a cautious user and one who dives in. On one hand UI copy can oversell safety, though actually that conversely made me scrutinize the metadata more than usual. So yeah—visual trust signals should be paired with obvious links to source data, not just badges.
![]()
I started relying on the extension because it makes verification immediate and visible. Wow! The overlay surfaces ownership concentration and recent transfers in a glance, which is especially useful during volatile times. The integration with etherscan felt natural—it’s not flashy, just useful—and it links you to the chain history when you want to dig in. My instinct said the single-click path to the source could cut down on impulsive trades, and the data proved helpful more than once.
There’s nuance though. Whoa! Not every token has rich metadata, and sometimes the verification status lags behind actual audits. Initially I thought that a « verified » badge was the end of the story, but then realized verification processes vary across platforms. On one hand a badge reduces cognitive load, though on the other hand it can create a false sense of security if users skip the transaction details. So the extension is best seen as a guardrail, not a seatbelt that makes you invincible.
Let me be frank: the extension won’t replace due diligence. Really? Yes. My experience taught me to use it as a triage tool. Hmm… If something smells off—very very off—you still open the contract, check the source, and look at token supply mechanics. But the extension directs you toward those checks, saving time and preventing the « oops » moments. I’m biased, but I prefer tools that force a pause, even if it’s a tiny nudge.
Performance is another story. Wow! Lightweight extensions matter, because nobody wants a slow browser during trades. The one I tried was pretty responsive, though some features felt half-baked. There were UI glitches (minor, but real) and occasionally the token icon failed to load—simple stuff, but irritating when you’re in a hurry. Small bugs are forgivable, but repeated friction makes people disable extensions, which defeats the purpose.
A deeper design question: who updates the token registry? Hmm… Community curation vs centralized listing—each has trade-offs. Initially I thought community-first solves censorship and speed, but then realized it can attract bad actors who game the system. Actually, wait—let me rephrase that: a hybrid model, where community reporting is combined with automated heuristics and a moderation layer, seems the most resilient. That layered approach reduces both false positives and false negatives.
Security posture matters too. Whoa! Extensions can be a vector for attacks if permissions are too broad. I’m not 100% sure every user reads permission prompts, and that bums me out. My preference is minimal permissions and transparent code audits. (oh, and by the way…) open-source extensions invite scrutiny, which usually helps, though not every user checks the repo.
Practical tips from my trial runs. Wow! Keep a small checklist before interacting with new tokens: verify the contract, check holder concentration, scan recent transfers, and view the token’s approvals. If the browser extension shows strange spikes or a tiny holder base, treat it like a red flag. My instinct saved me when I spotted a single address holding 99% of supply—no chance I clicked buy that day.
There are trade-offs in convenience. Really? Yes. Sometimes the extension’s heuristics hide context, and you need the chain explorer for full clarity. Hmm… But for everyday protection, the extension reduces cognitive load and surfaces the right questions. I’m not saying it’s flawless, but it nudges behavior toward safer choices, which is ultimately the point.
Generally yes, if it’s well maintained and open-source. Whoa! Check permissions and review the maintainer reputation. Use it as a first line of defense, not the only line.
It reduces the odds by surfacing anomalies and verification hints, but it won’t stop every scam. Initially I thought it might be a silver bullet, but then realized that social engineering and phishing still bypass technical checks. So, a tool plus healthy skepticism equals better results.
Pause. Wow! Review the contract on-chain, check holder distribution, and search for audits or official announcements. If in doubt, wait or consult a trusted community resource before interacting.
Whoa! So I was thinking about trading platforms the other day. They feel similar at first glance but different under the hood. Initially I thought that picking software was mostly about pretty charts and broker promotions, but then a few late-night tests revealed deeper issues like data integrity, order handling peculiarities, and subtle slippage behaviors that matter when you’re trading live with real risk. I’m biased, but if you’re serious about backtesting, multi-asset support, and running automated strategies you should at least try the platform that many pros still use and that scales from demo accounts up to institutional workflows without much fuss.
Seriously? Downloading the wrong installer is surprisingly common. Many folks grab whatever looks easiest and later regret somethin’ like missing the broker-specific build or the right 64-bit installer. My instinct said « grab the broker version » at first, though actually, wait—let me rephrase that: choose the official client from a trusted source or the broker build if you need direct server profiles pre-configured. The difference shows up later when you test strategies across different tick data feeds and weekend gaps. Long story short, bad downloads create ghost problems that eat time and confidence when you’re trying to prove a system edge.
Here’s the thing. You can run the platform on Windows, macOS (with caveats), Android, and iOS. Most power users run a Windows VM or a VPS for persistent EAs and round-the-clock testing. If you want the smoothest experience on a Mac, you might use a wrapper or run a light Windows instance to avoid subtle execution quirks that pop up when the client isn’t native. For mobile monitoring the apps are decent, but they aren’t replacements for full strategy development and detailed chart work on a desktop where you can access the Strategy Tester and multi-threaded optimizations.
![]()
If you’re ready to grab the platform, download the official metatrader 5 installer from a trusted page and pick the build that matches your OS. Most US-based retail brokers will offer their branded version which auto-configures server lists and account types, while the generic client is useful for practicing with demo servers and exploring the platform’s native features without broker overlays. On one hand, using a broker build simplifies setup; though actually, on the other hand, the generic client sometimes makes debugging EAs easier because there’s less mystery about server-side tweaks and plugin interference. Check whether you need 32- or 64-bit, and if you’re installing on macOS, be ready for an extra step or two—some things need workarounds and not every feature behaves identically across OS ports. If you plan to trade automated systems live, consider pairing your install with a reputable VPS close to your broker’s servers to shave off latency and reduce slippage variance across sessions.
Hmm… technical analysis on this platform feels robust. There are dozens of built-in indicators and the flexibility to stack custom ones side-by-side with price action and volume studies. The Strategy Tester lets you run multi-currency backtests and even perform visual mode walkthroughs, though you should be careful: backtests look pretty but can mislead if your tick data is poor or if you forget to model spreads and swaps correctly. Initially I thought the tester was « good enough, » but after rigorous walk-forward testing and forward runs on demo accounts I realized the gaps that appear when real market microstructure comes into play. That shift in perspective changed how I validation-test systems before risking real capital.
Whoa! Automation matters more than most folks admit. EAs in MQL5 can be powerful, but they require disciplined coding and defensive checks for connection losses, partial fills, and unexpected broker messages. On one hand, you want speed and optimization; on the other hand, speed without sanity checks equals a fast way to blow an account in choppy news-driven conditions. My practical tip: build fail-safes, logging to files (or external services), and test on a VPS under live-demo conditions for several weeks before going live. Also remember that some brokers implement order types and execution quirks that affect EAs differently, so always validate with the broker’s demo first.
Really? People underrate order types and feed quality. Data fidelity matters for indicators, and order-handling nuances matter for execution. Something felt off about a strategy once because historical data had daily gaps that I didn’t account for, and that skewed the ATR bands used to size positions; I lost a week of debugging before spotting the issue. The takeaway is simple: validate your data, understand the broker’s server timezone and rollover rules, and be suspicious of too-smooth backtest equity curves—real markets are noisy and full of surprises. I’m not 100% sure your first strategy will survive, but disciplined testing reduces surprises and improves decision making over time.
Okay, so check this out—there’s more than just charts. The platform supports market depth, economic calendars (via plugins), alerts, and integration with payment or copy-trade services depending on broker rules. You can code in MQL5 for complex indicators and automated systems, and when you combine that with a stable VPS and disciplined risk management plans you get a workflow that handles both discretionary and systematic approaches. I’ll be honest: the UI isn’t the flashiest these days, but it is pragmatic and focused on workflow, which appeals to traders who prioritize reliability over glitter. If you trade professionally or aspire to scale strategies, the ability to backtest with multi-threaded optimization and then run the same EA with minimal changes on a live account is a practical advantage.
Pick the broker build if you want quick server setup and immediate account connectivity. Choose the generic client for clean testing and less broker-specific behavior, especially when debugging automated systems. Either way, verify account types and server settings before funding a live account.
Yes—MT5 offers robust charting, a wide indicator library, and a powerful MQL5 language for automation. The Strategy Tester and multi-currency backtesting capabilities are particularly useful for algorithmic traders, though you must ensure high-quality tick data and realistic modeling to avoid overfitting. I’m biased toward rigorous testing, but the platform gives you the tools to do it.
Whoa! I almost clicked « Connect » before I thought it through. Seriously? Yep — been there. My instinct said, « Just another wallet pop-up, » and for a second I ignored all the little red flags. Then things slowed down and I actually paid attention.
Okay, so check this out — browser extensions simplify crypto interactions in a way that feels like magic. Short story: they let you sign transactions from the page, pay with Solana Pay, and manage NFTs without constantly copying-and-pasting keys. But that convenience comes with trade-offs. On one hand, extensions run in your browser context and can be targeted by phishing, malicious scripts, or bad update behavior. On the other hand, well-designed wallets like the Phantom browser extension minimize exposure through strong UX and permission controls. Initially I thought extensions were just cookie-cutter software; then I watched a phishing site mimic a wallet UI and realized how crafty attackers can be.
![]()
Here’s the thing. Extensions are always « on » when your browser is open. That persistent presence is both a convenience and a vulnerability. If a malicious site manages to run a script in your tab, it can attempt to call wallet APIs and trick you into signing something. My rule now is simple: never approve without reading. Short. Clear. Non-negotiable.
But there’s nuance. Phantom’s design intentionally asks for user consent and displays transaction details. That reduces impulse-signing. Also, Solana Pay is a different beast — it streamlines merchant payments using signed transactions and QR flows instead of centralized rails, which can actually shrink attack surfaces when implemented correctly. On a technical level, Solana Pay shifts trust to on-chain settlement and less to intermediaries, which is neat. Though, of course, smart contracts and on-chain payment flows have their own failure modes.
Something else bugs me about wallet UX: people skip details because the prompt looks familiar. I’ve seen folks approve « contract calls » without parsing amounts. It’s a bad habit. I once almost lost some SPL tokens because I didn’t check the destination. Thankfully I caught it… just in time. That « caught it » feeling? That’s why friction matters sometimes. Friction can be a feature, not a bug.
Start with the obvious. Keep your seed phrase offline. Very very important. Do not paste it anywhere — not in search, not in chats, not even in notes you think are private. If you store backups, use a hardware wallet or an encrypted device.
Update deliberately. Browser extensions auto-update, which is convenient, but also a vector if an attacker compromises a developer account. So check permissions after major updates. If an update seems odd, pause and verify from official channels.
Limit connect permissions. Phantom and many extensions allow you to connect to specific sites only. Use that. If a site doesn’t need full account access, don’t give it. One permission at a time. My instinct says to connect everywhere — but that’s dumb. Be selective.
Use separate browser profiles. I run one profile for everyday browsing and another strictly for DeFi and NFTs. It keeps tokens and accounts siloed. Oh, and by the way… disable unnecessary extensions. The more extensions you have, the higher the chance of a malicious one interacting with your wallet.
Solana Pay is elegant because it turns payment intent into a signed transaction that the user authorizes. In practice, that means a merchant’s checkout will request a signature to transfer tokens or pay an invoice. If the UI matches the merchant, and the transaction details line up, it’s probably fine. But check the payee address. Seriously. A small typo or a confusing name can mean funds go to the wrong place.
Something felt off the first time I scanned a Solana Pay QR code at a pop-up vendor. The merchant name didn’t match the address shown in Phantom. My gut said: don’t. I asked the vendor to confirm, and they had an alternate checkout link that fixed it. Initially I thought QR = safe, but actually QR can be swapped or replaced, so vigilance matters.
Phantom offers on-device key storage, clear transaction details, and an intuitive permission model. They also added features to manage sites, connect/disconnect, and view past transactions — which helps with auditing. Use the transaction history. It tells you who you’ve interacted with and when. If you see an unexpected transfer, act fast.
Consider a hardware wallet for large holdings. Phantom supports hardware integrations, and pairing a hardware wallet adds a physical layer of security. It may feel slower, but for high-value assets, that extra step is worth it. I’m biased, but if it’s more than you can easily replace, hardware is the right call.
If you want a straightforward place to start with Phantom, check out the phantom wallet resource I used while teaching newbies — it’s a simple guide that covers installation and safety basics.
Yes, in theory. Extensions run in your browser and have attack surfaces. However, most successful attacks exploit user behavior — phishing, social engineering, or approving malicious transactions. Use best practices: keep seed phrases offline, review signatures, limit permissions, and use separate browser profiles. Hardware wallets further reduce risk.
Safer in some ways and riskier in others. Solana Pay reduces reliance on off-chain intermediaries and provides on-chain receipts, which is great. But developers and merchants must implement it correctly. Always verify payee addresses and merchant identity before approving transactions.
Comment un agrégateur DEX peut-il prétendre offrir « le meilleur prix » sur des swaps réalisés sur une douzaine de blockchains différentes ? C’est une question pratique pour tout utilisateur francophone qui veut connecter un wallet, comparer des routes d’échange ou comprendre quels coûts et risques sont vraiment en jeu. Cet article explique, pas à pas, le mécanisme qui permet à 1inch d’agréger la liquidité, les compromis opérationnels qui le limitent, et les décisions concrètes qu’un utilisateur en France, Suisse, Belgique ou Canada devrait prendre avant d’autoriser une transaction.
La promesse récente du projet — échanger des tokens aux meilleurs taux sur « 13+ chains » — est vraie en surface : 1inch recherche des routes entre DEXes, pools et AMM pour composer des swaps plus efficaces. Mais la manière dont cette optimisation est calculée, exécutée et sécurisée a des implications pratiques qu’il faut connaître si vous connectez votre portefeuille et cliquez sur « swap ». Dans ce texte je déconstruis le mécanisme, souligne ses limites, et donne des heuristiques d’usage.
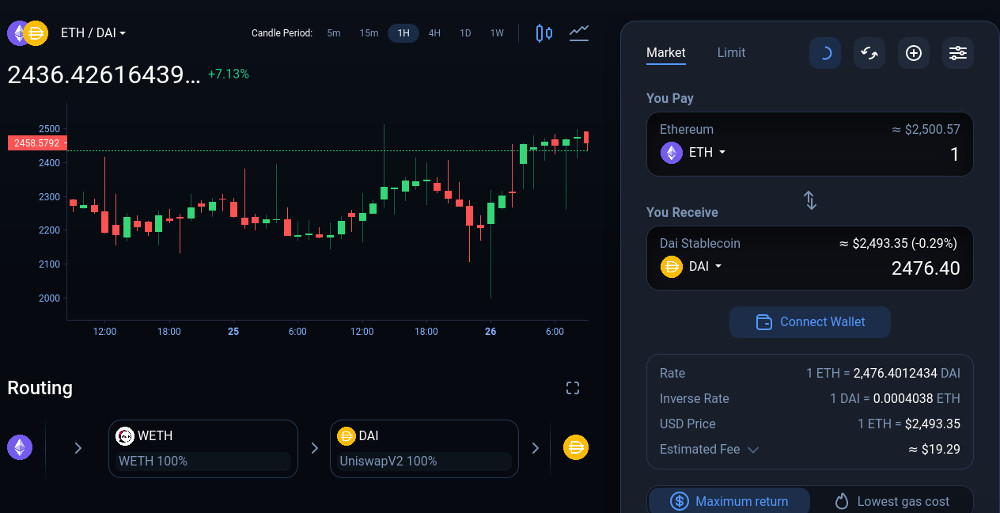
Un agrégateur DEX comme 1inch ne possède pas la liquidité : il orchestre l’accès à la liquidité disponible sur de nombreuses plateformes (Uniswap, SushiSwap, Curve, etc.) et sur plusieurs blockchains. Mécaniquement, le moteur d’1inch réalise trois opérations clés :
– collecte des cotations en temps réel depuis des sources multiples ;
– calcule des routes de swap qui peuvent fragmenter votre ordre entre plusieurs pools pour réduire le prix moyen payé ;
– génère une transaction groupée ou un ensemble d’appels intelligents (via des smart contracts) pour exécuter ces micro-splits en une seule opération ou en une suite atomique.
Le bénéfice apparent est simple : diviser un swap massif en fragments réduisant l’impact de price impact (glissement dû à l’épaisseur limitée d’un pool). Mais la gymnastique s’appuie sur deux choses fragiles : la latence des prix reçus et la capacité d’exécution atomique sur la chaîne ciblée. Si l’un échoue, le « meilleur prix » devient une promesse partielle.
Trois limites pratiques reviennent systématiquement et expliquent pourquoi il ne suffit pas de regarder le taux sur l’écran pour décider :
1) Glissement et front-running : les cotations utilisées pour composer les routes sont des instantanés. Entre le calcul et la confirmation, les prix peuvent bouger — et des acteurs (bots) peuvent tenter d’extraire de la valeur. 1inch utilise des mécanismes pour réduire ces risques (simulations, transactions atomiques), mais ils n’éliminent pas le danger, surtout sur des chaînes moins profondes.
2) Frais de gas multi-chaînes : l’optimisation du prix ne prend pas toujours en compte le coût en fees si l’utilisateur n’en tient pas compte. Sur certaines chaînes, fractionner un swap multiplie les appels et donc le gas ; pour des petits montants, le gain en price slippage est annulé par les coûts de transaction.
3) Risque contractuel et permission : exécuter des swaps fragmentés implique souvent de confier une autorisation au smart contract d’agrégation. Autorisations larges (infinite approvals) ou contrats récemment déployés peuvent augmenter l’empreinte de risque si une vulnérabilité est découverte.
Choisir entre utiliser un agrégateur ou swapper directement sur un DEX dépend de trois critères mesurables :
– montant du swap : plus il est grand, plus l’agrégateur a de chances d’améliorer le taux net ; pour de petites sommes, frais et complexité l’emportent souvent.
– profondeur de marché : sur des paires très liquides (ETH/USDC), la différence entre agrégateur et DEX direct est faible ; sur des tokens exotiques, l’agrégateur peut significativement réduire le slippage.
– sensibilité au temps : si vous avez besoin d’un exécution ultra-rapide, envoyer directement sur un pool connu peut être plus sûr que d’attendre qu’un routage multiplie les appels.
Avant de connecter un wallet depuis la France, la Suisse, la Belgique ou le Canada, appliquez ces règles simples mais puissantes :
– vérifiez toujours l’URL officielle et utilisez un bookmark : évitez les liens depuis des recherches non vérifiées. Pour une entrée pratique au projet, voyez la page d’informations de 1inch qui rassemble instructions et ressources utiles.
– limitez les autorisations : préférez des approvals limités plutôt que « infinite approval » et révoquez après usage si vous n’utilisez pas souvent une paire.
– simulez avant d’exécuter : beaucoup d’interfaces offrent une estimation de slippage et du gas. Si la variance entre l’estimation et le résultat probable est élevée, réduisez le montant ou augmentez votre tolérance de slippage consciemment.
– tenez compte de la fiscalité locale : en France, Suisse, Belgique et Canada, les règles fiscales sur les crypto-actifs diffèrent ; conservez des traces de vos swaps pour faciliter la déclaration.
Il y a au moins deux limites structurelles sur lesquelles les utilisateurs devraient garder un esprit critique :
– Exécution atomique incomplète : même si 1inch peut tenter d’exécuter plusieurs appels dans une transaction atomique, la capacité d’atomicité dépend de la blockchain sous-jacente. Sur certaines chaînes, l’atomicité totale est impossible et laisse place à une exécution partielle.
– Observabilité et transparence des routes : l’interface montre souvent la route optimale, mais les détails précis (fragments, l’ordre des pools) peuvent être opaques. Cette opacité rend difficile de vérifier ex post qui a capté la valeur d’un slippage ou si un arbitrage a été déclenché contre vous.
Pour décider rapidement : considérez montant, liquidité et coût. Cette heuristique « MLC » fonctionne ainsi :
– M (Montant) : petit (<100 € / équivalent) = privilégier simplicité ; grand = considérer agrégateur.
– L (Liquidité) : si la paire est peu liquide, agrégation probable avantageuse ; si très liquide, DEX direct suffira.
– C (Coût en gas) : calculez le coût additionnel de gas ; si > gain attendu, n’utilisez pas l’agrégateur.
Exemple : un swap de 50 € sur une paire exotique avec gas élevé → éviter l’agrégateur. Swap de 50 000 € sur ETH/USDC → agrégateur clairement utile.
Trois choses à surveiller dans les semaines et mois à venir :
– adoption inter-chain : si l’écosystème continue d’augmenter le nombre de chains supportées (comme l’annonce récente « 13+ chains »), attendez-vous à plus d’options mais aussi à plus de complexité d’exécution et de risques liés aux chaînes moins matures.
– évolution des frais de gas : une variation significative des coûts de transaction sur une chaîne peut inverser l’avantage d’un routage agrégé.
– audits et changements contractuels : tout déploiement d’un nouveau smart contract d’agrégation ou changement majeur dans la stack d’exécution doit augmenter votre vigilance sur les autorisations et la sécurité.
Non. L’agrégateur excelle surtout pour les montants substantiels et pour des paires peu liquides. Pour des petits montants sur des paires très liquides, les économies potentielles sont souvent annulées par les frais de gas et le risque opérationnel.
Réduisez la taille de l’ordre, augmentez légèrement le slippage autorisé si nécessaire, et considérez l’utilisation de fonctions de protection offertes par certaines interfaces (simulations, transactions privées). Aucune méthode n’élimine totalement le risque.
Exécution atomique signifie que toutes les étapes d’un swap groupé réussissent ensemble ou échouent ensemble. C’est important parce qu’elle empêche que seul un fragment soit exécuté, laissant l’utilisateur avec un résultat partiel et potentiellement défavorable. La disponibilité de l’atomicité dépend de la blockchain.
Oui, c’est une bonne pratique. Limitez la fenêtre d’autorisation et révoquez dès que vous n’utilisez plus la paire pour réduire l’exposition en cas de vulnérabilité future du smart contract.
En résumé : 1inch et d’autres agrégateurs offrent une vraie valeur technique — optimisation de routes, fragmentation pour réduire le slippage, et accès multi-chaînes — mais cette valeur n’est pas gratuite et elle n’est pas universelle. Comprendre la mécanique d’agrégation, mesurer le coût effectif (frais + risques) et appliquer l’heuristique MLC vous mettra dans une position plus sûre pour décider quand connecter votre wallet et exécuter un swap.
Zastanawiasz się nad wyborem konta firmowego i chcesz, żeby bankowość online działała gładko — bez niespodzianek przy fakturach i przelewach masowych? Ja byłem w podobnym miejscu kilka razy. Początkowe wrażenie: duży bank, dużo opcji, trochę chaosu. Potem okazało się, że większość spraw da się zautomatyzować, choć wymaga to kilku ustawień i dobrego przeglądu ofert.
Krótko: PKO BP ma rozbudowaną ofertę dla firm — od jednoosobowej działalności po większe spółki. System e-biznes (iPKO biznes) obsługuje przelewy, tantiemy podatkowe, integracje z programami księgowymi i autoryzacje transakcji wieloosobowych. Przy tym są rzeczy, które warto przemyśleć zawczasu: limity, uprawnienia użytkowników i sposób autoryzacji. No i opłaty — bo to one często decydują.
Oto co warto wiedzieć zanim otworzysz konto firmowe w PKO BP: krótkie, praktyczne wskazówki, które oszczędzą czasu i nerwów.
Najpierw cel. Jeśli prowadzisz JDG i masz kilka przelewów miesięcznie, nie musisz brać najdroższego pakietu. Jeżeli natomiast fakturujesz codziennie i potrzebujesz rozliczeń masowych, warto spojrzeć na konta z dodatkowymi funkcjami płatnymi. Sprawdź:
Rada z doświadczenia: porównuj całkowite koszty przy Twoim typowym obciążeniu (np. 50 przelewów miesięcznie + 30 wpłat kartowych). Czasem konto z wyższą opłatą podstawową wychodzi taniej, bo przelewy są tańsze.
Bezpieczeństwo to nie tylko hasło. Ustawienia uprawnień dla użytkowników (pracownicy, księgowa, pełnomocnik) decydują o tym, kto może inicjować przelew, a kto tylko go akceptować. W PKO BP możesz nadać szczegółowe role, co pomaga ograniczyć ryzyko błędów i nadużyć.
Autoryzacja transakcji — SMS, aplikacja mobilna, hasła jednorazowe — wybierz rozwiązanie, które jednocześnie jest wygodne i bezpieczne. Jeśli często pracujesz zdalnie, aplikacja mobilna z powiadomieniami będzie wygodniejsza niż ciągłe odbieranie SMS-ów. Jednak pamiętaj: urządzenia mobilne też trzeba chronić.

Jeżeli chcesz szybko dostać się do panelu lub wysłać upoważnienie, przydatny jest przewodnik krok po kroku — tu możesz sprawdzić link z instrukcją logowania i podstawowych opcji, klikając here. To przyspiesza ustawienia, zwłaszcza gdy robi to księgowa lub ktoś nowy w zespole.
Kilka praktycznych uwag przy logowaniu i konfiguracji:
PKO BP oferuje eksporty plików płatniczych w formatach używanych przez popularne programy księgowe. To znacznie redukuje czas pracy księgowości. Jednak integracja wymaga ustawień po obydwu stronach: bank — program — uprawnienia użytkowników. Zdarza się, że coś nie przejdzie przez format pliku, więc miej plan B (np. szybkie ręczne przelewy lub wsparcie IT).
Od siebie: nie zaufaj w 100% automatom bez audytu. Automatyzacja jest świetna, ale czasem samoukrytycznie sprawdzam raporty — i dobrze, że to robię. Lepiej znaleźć błąd wcześniej niż dopiero przy kontroli.
Banki często oferują promocje dla nowych klientów — zwróć uwagę na okres promocyjny i warunki zwolnienia z opłat. Często wymagana jest aktywność: określona liczba transakcji lub minimalne wpływy. Przelicz wszystko na 12 miesięcy, bo promocyjna darmowa obsługa może skończyć się dość szybko.
Otwarcie konta zwykle zajmuje od kilku godzin do kilku dni, w zależności od kompletności dokumentów i formy prawnej firmy. Jeśli wszystko jest w porządku (dowód, NIP, ewentualne pełnomocnictwa), proces online może być szybki — pamiętaj jednak o ustawieniu uprawnień i limitów przed wysyłaniem większych przelewów.
Here’s the thing. Trading derivatives feels different than spot trading; the math bites faster. I remember thinking I could handle leverage casually, and then markets reminded me who’s boss. Initially I thought leverage was an all-purpose amplifier for gains, but then I learned about funding rates, liquidation ladders, and subtle fee mechanics that quietly erode profits. So this piece is about practical moves you can actually use — not theory-only fluff — and about how fees and leverage interact on decentralized venues.
Wow! Derivatives let you express views without owning the underlying asset, which is liberating. You can go long or short, hedge spot exposure, or arbitrage between venues to capture fleeting inefficiencies. My instinct said « use max leverage » in the early days, and that was a mistake. Actually, wait—let me rephrase that: using lots of leverage can be smart in structured scenarios, though usually it increases tail risk dramatically. On one hand leverage magnifies returns; on the other hand it amplifies borrowing costs and liquidation risk, so you must plan for both.
Really? Fees are more than just a line item — they shape strategy in surprising ways. Maker/taker spreads, funding rates, and withdrawal gating all change effective P&L. Something felt off about treating fees as negligible, and indeed many traders underprice them. If you scalp with tight edges, maker rebates or reduced taker fees can determine viability; if you swing trade, funding rates over days or weeks will matter a lot. I’m biased toward platforms that make fees transparent and predictable, because surprise costs are the fastest way to ruin a good strategy.
Whoa! Order types matter almost as much as fees for derivatives. Limit, market, post-only, reduce-only — these are the tools that let you control execution outcomes. On some DEXs, slippage on illiquid pairs eats fees and then some, which is something I wish someone told me sooner. Actually, I learned to size entries conservatively and stagger fills when liquidity looked shallow, and that cut my realized costs by a lot. (oh, and by the way…) practice small fills on unfamiliar markets before going full size.
Here’s the thing. Leverage availability isn’t uniform across platforms; some offer isolated margin per position while others use cross-margin that aggregates risk. Isolated margin limits your downside to a position, which protects your overall balance, though it can also require more active management. Cross-margin is efficient capital-wise but if one position spikes against you it can wipe multiple positions, which matters if you’re running a portfolio. Initially I favored cross-margin because it felt leaner, but then I experienced a cascade liquidation that made me rethink that posture.
Wow! Funding rates are persistent cost centers for leveraged positions and they flip often. A long-term long can bleed out if funding stays positive and you keep paying to hold the trade. Funding is effectively a continuous fee paid between longs and shorts, and during trends it can become very very important to model. My instincts warn me to always check historical funding volatility before holding beyond intraday. On decentralized platforms funding can be more transparent, though watch for hidden slippage and off-book fills.
Really? Liquidity depth defines your realistic leverage ceiling. You can claim 20x on paper, but if the order book would shift with your trade you simply cannot exercise that leverage without cost. I used to ignore order-book resilience and then paid through the nose in execution loss. Now I scan depth across multiple venues and size positions to interact with only the top of the book, which reduces surprise movement. There’s a trade-off: staying small preserves execution quality but can reduce returns versus an aggressive sized move that deliberately sweeps liquidity.
Whoa! Fees structures vary by model — flat fees, maker/taker tiers, or dynamic bands tied to volume. Some venues offer maker rebates that reward liquidity provision, and that can flip an expected loss into a tiny edge if you’re systematic. On the flip side, high taker fees destroy scalping strategies, so know your expected trade style before locking into a fee tier or staking program. I’m not 100% sure about the long-term economics of fee rebates tied to token incentives, but I’ve seen them distort order flow in odd ways.
Here’s the thing. Decentralized derivatives exchanges have matured; they now offer sophisticated matching, on-chain settlement, and custody that keeps you in control of keys. They also introduce unique trade-offs: slower settlement depending on L2 throughput, and occasionally higher on-chain fees when minting or closing positions. I prefer venues that keep order matching off-chain but settlement on-chain for speed and finality, and that balances latency with crypto-native custody. One such platform I’ve used extensively is dydx, which blends order-book matching and on-chain settlement well for many traders.
Wow! Risk management rules are simple in principle but hard in practice. Use stop-losses, size positions relative to portfolio risk, and never risk so much that a single liquidation ruins your edge. My gut tells me that position sizing is the single most under-appreciated skill among retail traders. Actually, wait—let me rephrase: position sizing plus discipline is the compound engine of long-term success. When I violated my sizing rules early on, I learned faster than I’d have liked.
Really? Leverage should be treated as a tactical tool, not a permanent setting on your account. You might use 3x for a swing, 10x for a short-term scalp, and effectively 0x for long-term directional exposure. On one hand having flexibility helps exploit different market regimes; though actually, multiple regime shifts in a short window can wreck leveraged strategies if you don’t actively rebalance. I tend to set a maximum exposure ceiling per trade and a hard liquidation buffer, and that habit saves me from impulsive increases during FOMO.
Whoa! Taxes and regulatory nuance also change the calculus, especially in the US where derivatives can trigger different reporting and tax treatments. Keep clear records of fees, funding payments, and realized P&L per trade. I’m not your accountant, but I will say this: sloppy bookkeeping makes audits painful and expensive. (that said, sometimes I procrastinate on spreadsheets… somethin’ about them feels like homework.)
Here’s the thing. Execution tactics can shrink your fee burden: staggered limit orders, using post-only to capture maker rebates, and avoiding market on open when volatility is high. If you trade news, accept slippage as a cost of immediacy and plan around it. My strategy evolved to differentiate between urgent trades and patient trades, and that separation reduced fees and improved realized edge. To be honest, that organizational discipline was the turning point for my accounts.
Wow! Monitoring and automation reduce human error with leverage. Alerts for margin ratios, automated partial exits, and scripts that reduce exposure when volatility spikes are invaluable. Initially I resisted automation, thinking manual oversight was safer, but then a weekend flash sold through my positions and automation would have capped the damage. Now I use conservative auto-rules and manual overrides, which feels like the right balance for me.
Really? Compare fee profiles across venues not just by headline rates but by realized cost per round trip under real market conditions. Simulate trades using historical order books if you can, or at least run small live tests to measure slippage and effective funding over time. On some platforms, withdrawal and on-chain settlement costs can wipe thin edge strategies even if trading fees look low. I’m biased toward experiments over assumptions, because the market is the final arbiter.
Whoa! Here are quick practical rules I follow: cap leverage to what you can mentally monitor; size positions as a fixed percentage of active capital; forecast funding as part of cost; use reduce-only orders for pyramiding; and favor venues with transparent order books. These aren’t perfect, but they keep me in the game. I’m not claiming a silver bullet — just habits that reduce surprise and preserve optionality.
![]()
Here’s the thing. If you’re trading derivatives regularly, build a simple checklist: check liquidity, check funding, pick leverage, size entry, and set automated protections. That flowline reduces impulsive errors and aligns fees with expected holding time. I’ll be honest — I still break the checklist sometimes during big moves, and that part bugs me, but the checklist saves me more than it costs. Over time, these routine checks compound into steadier returns and fewer catastrophic days.
Fees and funding are ongoing costs that make holding leveraged positions more expensive over time, so higher leverage is cheaper only for very short-term trades; for multi-day holds, lower leverage often yields better risk-adjusted returns. Model funding rates and expected trade duration before picking leverage, and prefer platforms with clear fee math so you can simulate outcomes.